Skip to content




When you scroll through the pages of successful e-commerce brands, you will notice that their products don’t just appear. They command attention. This is thanks to the brilliant visuals that accompany them. In a world where buyers make decisions in milliseconds, e-commerce photography is no longer about making your products look good. They have added responsibilities like making your products instantly trustworthy and desirable. To help you achieve this for your own brand, we are going to share some of the best e-commerce photography tips that actually move the needle.
Essential pre-shoot tips (Preparation and planning)
Great e-commerce visuals are rarely the result of spontaneity. Great product photography services are often driven by careful planning. Here are some top e-commerce photography tips you need to follow even before you lift the camera:
1. Always define and document your brand aesthetic
From day 1, have a clear alignment on how your brand should look and feel. Your brand aesthetic defines the visual rules, such as color palette, lighting style, backgrounds, and overall mood that guide every image you create. Its primary purpose is consistency, ensuring your product visuals feel cohesive across listings and channels. When defined upfront, your imagery strengthens brand recognition rather than appearing like disconnected, one-off executions.
Aesthetic choices track closely with category, so start from where your catalog sits — the visual conventions buyers expect differ sharply across e-commerce verticals. Here are some common types of aesthetics adopted by different e-commerce brands:
| Brand aesthetic | Visual characteristics | Used commonly by brands dealing in |
| Minimal and clean | White or neutral backgrounds, soft lighting, and clutter-free | Electronics, home appliances, office supplies, etc. |
| Luxury and premium | Dark tones, dramatic lighting, rich textures, and high contrast | Fashion, jewelry, watches, high-end beauty, home decor, etc. |
| Bold and playful | Vibrant colors, dynamic angles, and creative props | Toys, accessories, novelty products, etc. |
| Natural and organic | Earthy colors, natural light, raw textures, and outdoor elements | Wellness, food, eco-friendly, sustainable products, etc. |
| Technical & Detail-Focused | Sharp lighting, macro shots, and precise angles | Electronics, tools, hardware, etc. |
| Modern & Futuristic | Clean lines, gradient backgrounds, and bold lighting | Technology, gadgets, innovation-led products, etc. |
| Warm & Handmade | Soft tones and textured backdrops | Artisanal, handmade, small-batch products, etc. |
2. Never start a shoot without a clearly defined shot list
A shot list acts as your execution blueprint. It defines exactly what images need to be produced and for which use case. This level of planning prevents missed assets and reduces reshoots. In other words, it makes sure nothing is left to interpretation at a critical time, and you don’t make creative decisions on the fly. When done right, a shot list doesn’t just organize production; it ensures your visuals directly support discovery, evaluation, and conversion as your catalog scales.
Here are some of the product shots commonly used in e-commerce product photography –
| Shot type | What it includes |
| Hero product shot | Front-facing image, usually on a clean background |
| Alternate angle shots | Side, back, top, or 45-degree views |
| Close-up detail shots | Macro images highlighting texture and materials |
| Lifestyle shots | Product shown in real-world or usage scenarios |
| In-use shots | Product being actively used by a model or hand |
| Scale reference shots | Product shown alongside common objects or models |
| Variant shots | Images of different colors, sizes, or configurations |
| Packaging shots | Product packaging or unboxing visuals |
| Feature callouts | Annotated images highlighting benefits or specs |
3. Prepare every product for high-resolution scrutiny
Next, ensure every product you plan to photograph is in flawless, sell-ready condition. This means cleaning surfaces, removing dust or fingerprints, ironing fabrics, polishing reflective materials, and fixing minor defects that could distract the buyer. Remember – Small imperfections become highly visible in high-resolution e-commerce images. Overlooking them can undermine perceived quality and trust.
Garments need the most prep of any category, a single crease or loose thread reads as poor quality at full resolution, which is why how to photograph clothes for ecommerce starts with a steamer rather than a camera.
Equally important is consistency across units. If you are photographing multiple products or variants, each one should look uniform in shape and presentation. Preparing products in advance reduces retouching time and ensures your visuals accurately reflect what customers will receive.
4. Use backgrounds to support the product, not compete with it
Your background plays a critical supporting role in e-commerce photography. The goal of a background is not to compete with the product, but to frame it in a way that enhances clarity and focus. The key is alignment with your brand aesthetics. A well-chosen background also ensures consistency across your catalog, making it easier for buyers to evaluate and compare products.
Some of the commonly used backgrounds include:
| Background type | When to use it |
| White | When clarity and consistency are required for hero images and large catalogs |
| Neutral solid | When you want a clean look with a subtle brand personality |
| Textured | When material quality or craftsmanship needs to be highlighted |
| Lifestyle | When helping buyers visualize real-world use and build an emotional connection |
| Gradient | When you want a modern, high-impact look without visual clutter |
| Outdoor | When the product naturally fits a natural or open environment |
5. Design your lighting setup to showcase product quality
Lighting is what brings your product to life. Before shooting, plan how light will shape your product’s form and texture. Soft, even lighting is ideal for most e-commerce use cases as it minimizes harsh shadows and highlights product features accurately. More directional lighting can be used intentionally to add depth or drama, as long as it remains consistent with your brand aesthetic. Planning your lighting setup in advance ensures your images look balanced and conversion-ready across all channels.
Essential in-shoot tips (Execution and quality capture)
Once preparation is complete, execution is where ecommerce product photography is truly won or lost. These tips focus on capturing comprehensive, high-quality imagery that supports evaluation and reduces ambiguity:
6. Show the product from multiple angles
A single angle rarely tells the full product story. Shoppers cannot touch or examine items physically. So your images must compensate for that limitation. Capturing multiple angles allows your buyers to understand the product’s shape, depth, proportions, and construction more accurately. Front, back, side, top-down, and three-quarter views typically work together to eliminate guesswork and build confidence. Here is an example of a brand that has captured a product from multiple angles:
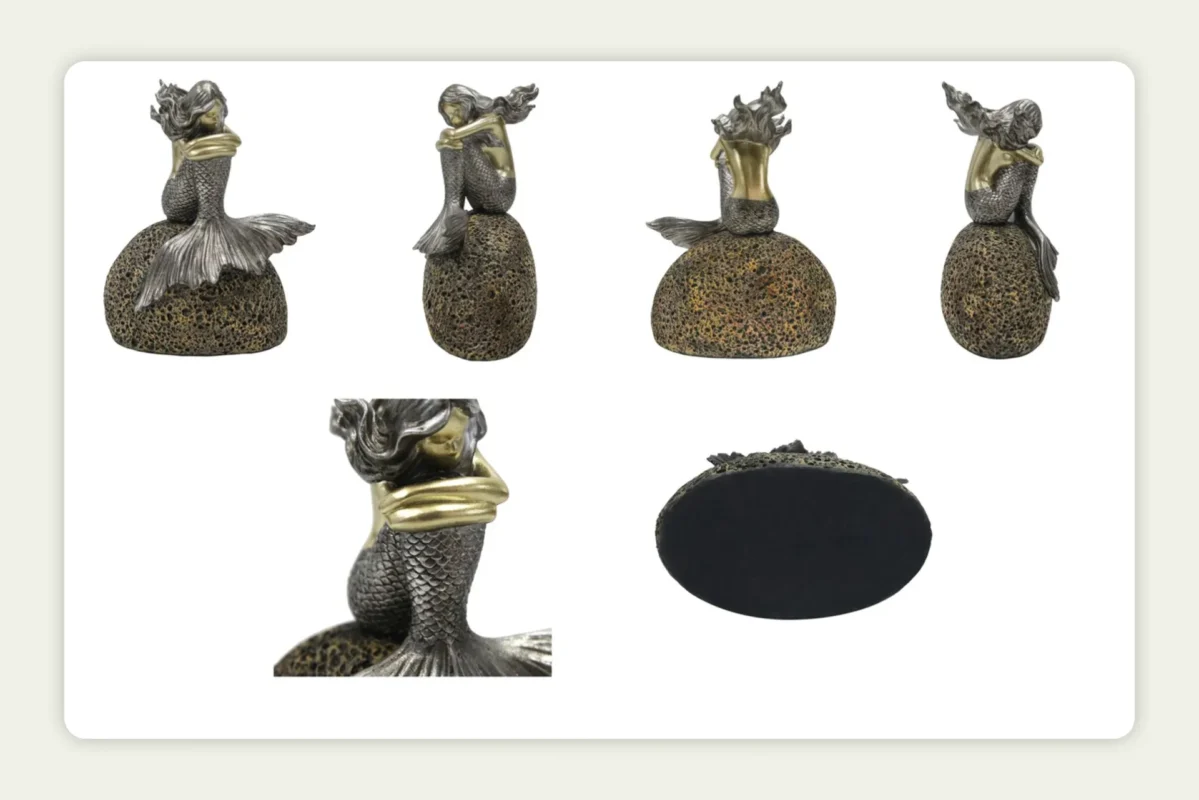
From a performance standpoint, multiple angles also reduce return rates caused by unmet expectations. They help answer silent questions such as how thick the product is, how it looks from behind, or how components connect.
7. Use close-ups to prove quality, not just claim it
Detail shots are where trust is built. Close-ups allow buyers to evaluate texture, material quality, finishes, stitching, buttons, ports, labels, or craftsmanship that may not be visible in wider frames. These images are especially important for products where quality perception directly influences price justification, such as electronics, fashion, beauty, tools, or home goods.
For instance, here is a close-up shot of a blanket that gives a better idea of the quality and the material used:
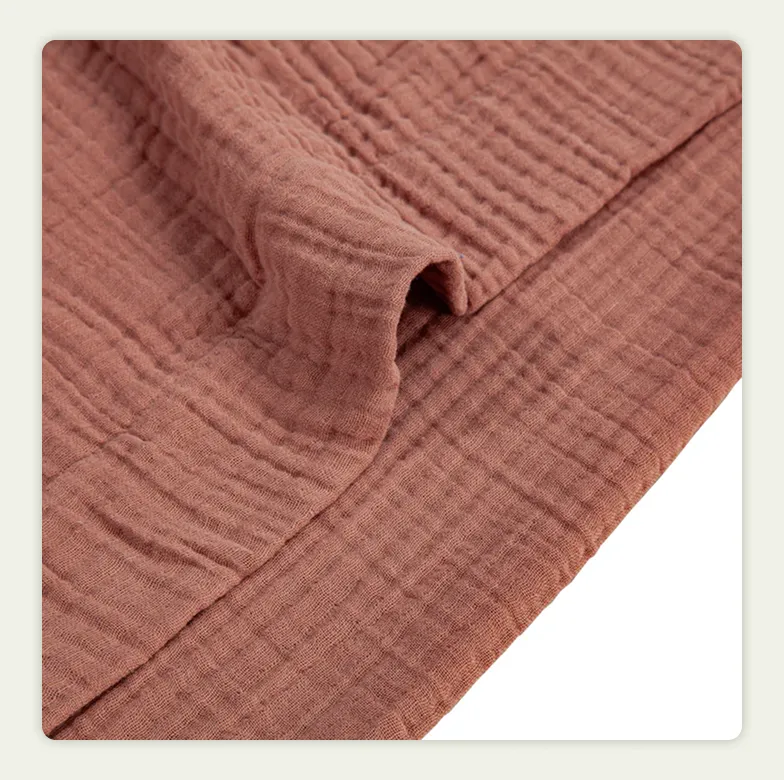
High-quality close-ups also reduce reliance on long descriptions. Instead of telling buyers about premium materials or precise engineering, you show it. When executed well, detail shots help buyers move from interest to intent by reassuring them that the product matches the claims made on the page.
8. Use lifestyle context to help shoppers imagine ownership
Lifestyle imagery bridges the gap between product and ownership. When you show the product in a realistic retail or usage context, you help buyers visualize how it will be merchandised or used by their end customers. This emotional connection is often what separates browsing from buying, especially for lifestyle, home decor, wellness, and fashion categories.
For instance, here is a product captured in a lifestyle setting:
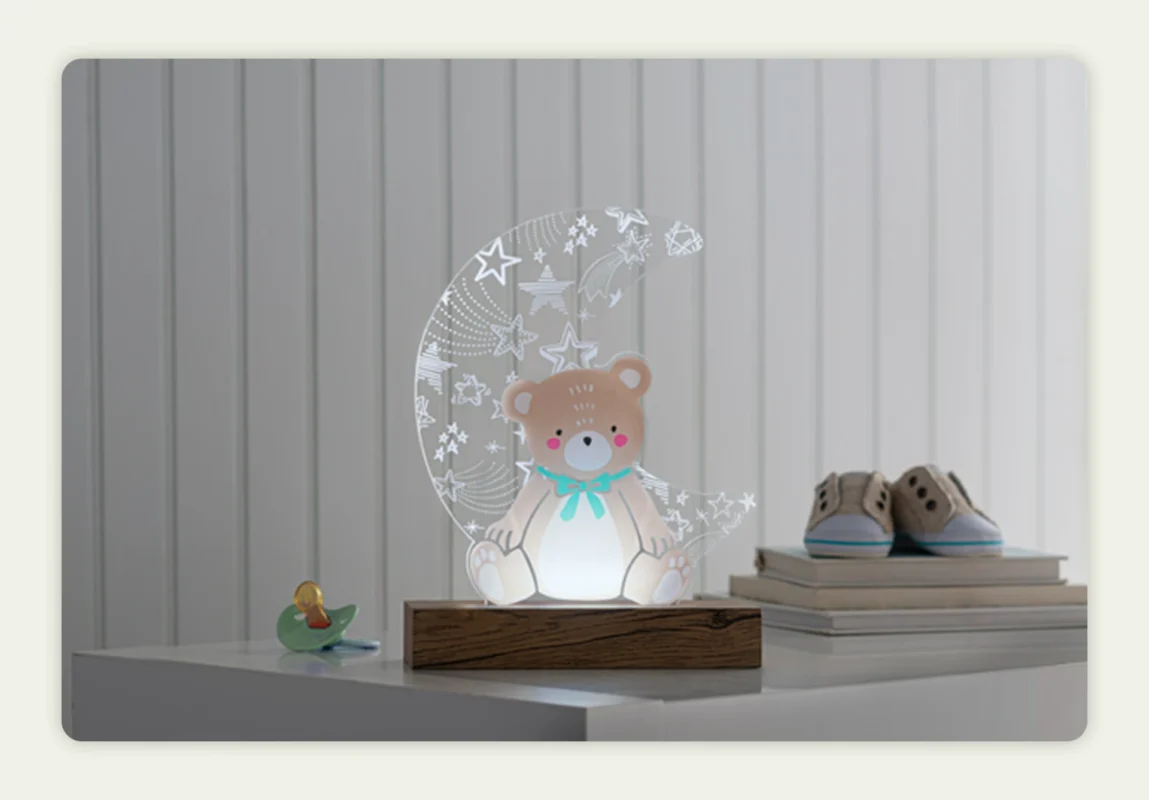
Beyond inspiration, lifestyle shots also provide functional clarity. They demonstrate real-world scale without relying on explanation. Whether the environment is physically staged or digitally generated, lifestyle context adds meaning to the product and supports storytelling.
9. Include visual cues for size and scale
One of the most common reasons for e-commerce returns is incorrect size perception. Including scale indicators helps eliminate this risk. Scale can be communicated by placing the product next to familiar objects, showing it in use, or including hands, models, or environmental references that buyers instinctively understand.
Here is an example where the product is placed alongside a complementary item, providing a clear visual reference for size:

This approach is especially critical for small items, compact electronics, decor, accessories, and tools. Scale indicators reduce hesitation, improve buyer confidence, and set accurate expectations. From a business perspective, this leads to fewer size-related complaints, lower returns, and higher customer satisfaction. You can also add measurements to photos using dimension lines, so buyers see exact product dimensions at a glance.
10. Capture in RAW to protect image quality and flexibility
Shooting in RAW format preserves the maximum amount of image data. This gives you far greater control during post-processing. Unlike compressed formats, RAW files retain details in highlights and shadows. This helps with precise color correction and exposure adjustments,
Capturing in RAW format also ensures that your images remain adaptable to different platforms, background changes, cropping requirements, and future updates without degradation in quality.
Essential post-shoot tips (Editing & optimization)
Post-production is where your raw captures are transformed into visual assets. Remember – editing is not about transforming the product. It’s about presenting it clearly and accurately. These post-shoot practices help you achieve that:
11. Retouch without misleading
Here’s a simple thumb rule – Retouching should enhance clarity, not alter reality. It must remove distractions such as dust, minor blemishes, creases, and background inconsistencies — an AI photo cleanup tool handles these in seconds — while preserving the product’s true appearance. Over-editing that changes color, texture, size, or finish can lead to broken expectations and higher return rates.
When your customers receive the product that looks exactly like what they saw online, it is going to reinforce your brand’s credibility. So, subtle and honest edits are the way to go rather than aggressive manipulation.
12. Use consistent editing presets
When you use standardized editing presets (uniform exposure, color balance, contrast, and shadow depth) across all images, your catalog will look more professional and well-curated. This is true even when your products vary in shape or material.
From a scalability perspective, presets also streamline workflows. For instance, they speed up editing and make it easier to onboard new products without compromising visual quality.
13. Optimize image sizes for faster loading
Large, uncompressed files slow down pages. This negatively impacts user experience and hurts SEO and conversion rates. One study by Google found that people leaving your site increases 32% when a page’s load time extends from one second to just three seconds.
So, the key is to optimize them. Now, this doesn’t mean you compromise on their quality. Optimizing here simply means enabling fast load times without sacrificing visual clarity. By resizing images appropriately and using modern formats where applicable, you strike the right balance between quality and speed.
This optimization is especially important for mobile shoppers, where performance directly influences engagement and bounce rates.
You can resize images using online optimization tools such as Squoosh or TinyPNG. When compressing images, ensure quality is preserved by exporting them in efficient formats like JPG, PNG, or Google’s WebP.
14. Name and organize files properly
Clear file naming and structured organization are often overlooked but incredibly valuable. Descriptive filenames make assets easier to locate and manage. It also makes it easy to reuse across teams and platforms.
Right naming practices also support SEO by making your images more discoverable in search, as search engines use descriptive filenames to better understand and index visual content. Greg Bernhardt, senior SEO strategist, Shopify, rightly says –
“The clearer you can be about what an image depicts, it’s all the better for a search engine, and a file name is one of the clearest, easiest signals you can provide,”
Proper organization becomes even more critical when you are scaling content production or collaborating across different teams. Well-structured assets save time and keep your visual library future-ready.
Here are some examples of poor file naming and proper file naming practices:
| Poor file naming | Proper file naming |
| IMG_1023.jpg | GreenSoul_OfficeChair_Black_Front_Hero.jpg |
| product_final_v2.png | GreenSoul_OfficeChair_Black_Side_Angle.jpg |
| edited_1.jpg | GreenSoul_OfficeChair_Black_CloseUp_Material.jpg |
| blue-chair-new.jpg | GreenSoul_OfficeChair_Black_Lifestyle_Retail.jpg |
| final_image.jpg | GreenSoul_OfficeChair_Packaging_Box.jpg |
15. Test images on different devices
Images that look perfect on a desktop may not perform the same on mobile or tablet screens. When you test across different devices, you make sure that your visuals retain clarity and have the same impact regardless of screen size or resolution.
When you test, you can also identify cropping issues and issues related to text legibility in annotated images. These are important for user experience. Similarly, it shows any loading performance under real-world conditions. By validating images across devices, you ensure a reliable experience for every buyer, no matter how they browse.

One tip that beats all others: Leverage an AI photography platform
There was a time when AI photography platforms could only do basic editing. Today, they streamline the entire e-commerce photography workflow. From removing background to lifestyle scene generation, they handle all.
If you are a brand with a large catalog and working with a strict deadline, a bulk product image generator is manna from heaven. They eliminate the need for repeated reshoots. You don’t have to rebuild a shoot every time you need a new background or angle. Put simply, you can generate on-brand visuals digitally in a fraction of the time.
The impact on cost is equally significant. AI tools cut down expenses associated with studios, logistics, and post-production. This allows you to move without friction from product readiness to go-live.
Finally, these AI product photo generators also emphasize brand consistency as they let you standardize visual rules, presets, and styles across the entire catalog.
In an environment where speed and efficiency directly influence revenue, AI photography platforms have become a key part of how e-commerce and wholesale brands create and scale visual content. If you’re weighing specific tools, our roundup of Claid alternatives ecommerce brands are using breaks down how several popular platforms compare.
WizStudio: The best e-commerce photography platform powered by AI

WizStudio is one such AI product photography platform built specifically to help e-commerce and wholesale brands create high-quality visuals without the time and operational overhead associated with traditional e-commerce photography. WizStudio takes your existing product photos and transforms them into polished, ready-to-upload visuals using intelligent AI. No more studios, props, complex setups, or juggling multiple editing tools.
At its core, WizStudio was designed for speed and scale. You can not only turn simple product shots into immersive lifestyle visuals but also enhance photos with AI-powered editing that mirrors professional retouching.
And, if you want additional assistance, WizStudio also offers a hybrid done-for-you service that combines AI efficiency with expert human oversight. The result is a more flexible way to produce professional product imagery that stays consistent across your catalog.
Want to explore WizStudio and its capabilities in more detail? Sign up for a free trial to experience the platform firsthand.
Frequently asked questions
1. What are the best image sizes for Shopify/Amazon?
The best image sizes for Shopify and Amazon are 2048 x 2048 pixels and 1600 x 1600 pixels, respectively. Maintaining these square dimensions ensures high-resolution zoom functionality, which remains one of the best e-commerce photography tips for driving higher customer conversions on major online marketplaces.
2. How to show product texture in photography?
To show product texture in photography, you must place your main light source at a sharp side angle to create grazing light. If physical staging feels too difficult, utilizing modern software like WizStudio AI allows you to instantly correct lighting, enhance surface details, and produce hyper-realistic textures digitally.
3. How do I take high-quality e-commerce photos?
To take high-quality e-commerce photos, you must use a tripod, shoot in RAW format, and rely on diffused lighting. However, busy wholesalers can bypass traditional photoshoots entirely by uploading raw warehouse pictures into WizStudio AI to generate catalog-ready lifestyle visuals in seconds.
4. What is the best setup for DIY product photography?
The best setup for DIY product photography includes a smartphone, a sturdy tripod, a folding table, and a large window for natural light. Embracing these accessible tools allows emerging businesses to execute the best e-commerce photography tips perfectly without investing thousands in a professional studio space.
5. Best studio lighting setup for e-commerce on a budget?
A budget e-commerce setup doesn’t require expensive photography lighting equipment – two continuous LED panel lights at 45-degree angles work well. To skip the expensive equipment altogether, innovative platforms like WizStudio AI automatically handle complex shadows and environmental lighting, delivering premium e-commerce photography tips through automated technology.
6. What is the 9 square rule in photography?
The 9 square rule in photography is another name for the Rule of Thirds, which divides an image into nine equal segments using two horizontal and two vertical lines. Placing your product at these intersections creates a visually pleasing balance, serving as fundamental e-commerce tips for photographers.
7. What colors do not photograph well?
Colors that do not photograph well include highly saturated neon shades, stark whites, and solid deep blacks. Neons often clip digital camera sensors, while pure whites and blacks lose fine details easily, making color correction an essential step when practicing professional e-commerce tips for photographers.
8. How to create a pure white background for product photos?
Creating a pure white background for product photos requires placing your item on a seamless white paper sweep and overexposing the backdrop. Alternatively, tools like WizStudio AI isolate your product in a single click, instantly removing backgrounds and generating perfect silo shots for your digital inventory.
9. What are the 4 pillars of photography?
The 4 pillars of photography are shutter speed, aperture, ISO, and light quality. Mastering the interplay between these elements gives you full control over exposure and depth of field, laying the groundwork for executing advanced e-commerce photography tips that make your online catalog look beautiful.